Today marks the Anniversary of my marriage to the most amazing man in the world. We have been married for 5 years today! Of course I had to make an extra special card to mark the occasion and this is the result. I decided to use the Circle Thinlits Card Framelit and gold...lots of gold!
The You & Me is heat embossed with gold, the Gold Foil Sheet is dry embossed with the Arrows Embossing Folder. I chose Naturals White Card Stock as opposed to Whisper White because I wanted to the card to still have an earthy balance, even though it was covered in gold.
I decided to add some Gold Baker's Twine wrapped around the card not only to keep it closed, but to add some more interest to the card. So it's both functional and beautiful!
I LOVE Cadbury Crème Eggs and wanted to come up with a cute way to hold them to hand out as gifts. So I created this sweet little bag to fit them! It's super simple to make and of course fits lots of other things too, so it could be used for other types of candy or even for a different holiday! The first thing you will need is a piece of designer series paper that measures 7 1/2" X 5". With the long side at the top of your Simply Scored Scoring Tool score it at 1 1/2", 3 1/2", 5" and 7". Turn it 90 degrees so the short side is along the top and score it at 1 1/2". Now just trim off the small rectangle created on the bottom. Burnish your score lines and trim up the rest of the bottom scores to the next score line. Apply sticky strip to the narrow rectangle and fold your bag together sealing the sticky strip. Simply fold up the bottom flaps and adhere. You could now just pinch in the sides and use a mini clothes pin or paper clip to hold the bag closed, but I chose to punch a hole through both layers of paper and thread some ribbon through and then tied a knot.
I stamped my bunny, punched him out with the 7/8" Scallop Circle Punch and then popped it up with a dimensional on 1" Crushed Curry Circle. Add a little pearl to the bunny's tail and this sweet little treat bag is complete!
Some people have come to lovingly refer to the paint mark in the Happy Watercolor Stamp Set as "THE BLOB" DUN DUN DUN!
It single handedly creates a stunningly beautiful watercolor mark with one stamp! I adore it! I often design card around a piece of designer series paper or a ribbon I like and this card was no exception. Stampin' Up! gives us the wonderful gift of coordinating products, so why not take advantage of it and take the guess work out creating a beautiful project!?! For this card I chose a piece of DSP from Watercolor Wonder, the colors are Whisper White, Smoky Slate and Daffodil Delight...and off to the races!! Because my ink, paper and embellishments all coordinate it made creating this card a snap!
I hope you enjoy this card as much as I do and will give the Watercolor Wonder Suite a try!
Good morning fellow stampers! It's the start of another week and I want you to know I'm "Sending Good Thoughts Your Way" for the week! As you all know I am IN LOVE with the Scalloped Tag Topper Punch and am constantly trying to find new and innovative ways to use it, but sometimes putting it on a card is all you need. This card is created using a lot of watercolor type elements that I have pulled from our beautiful Watercolor Wonder Designer Series Paper. The colors I used come straight from the paper...Crushed Curry, Tangerine Tango and Whisper White. I hope this beautiful card brightens your day and brings you a wonderful week!
Supply List:
Whisper White Card Stock#100730
Crushed Curry Card Stock#131199
Watercolor Wonder DSP#132994
Scalloped Tag Topper Punch #133324
Circle Framelits#130911
Tangerine Tango Classic Ink #126946
Crushed Curry Classic Ink #131173
Crushed Curry Chevron Ribbon #130019
Calypso Corral Baker's Twine #125573 (it's similar to Tangerine Tango)
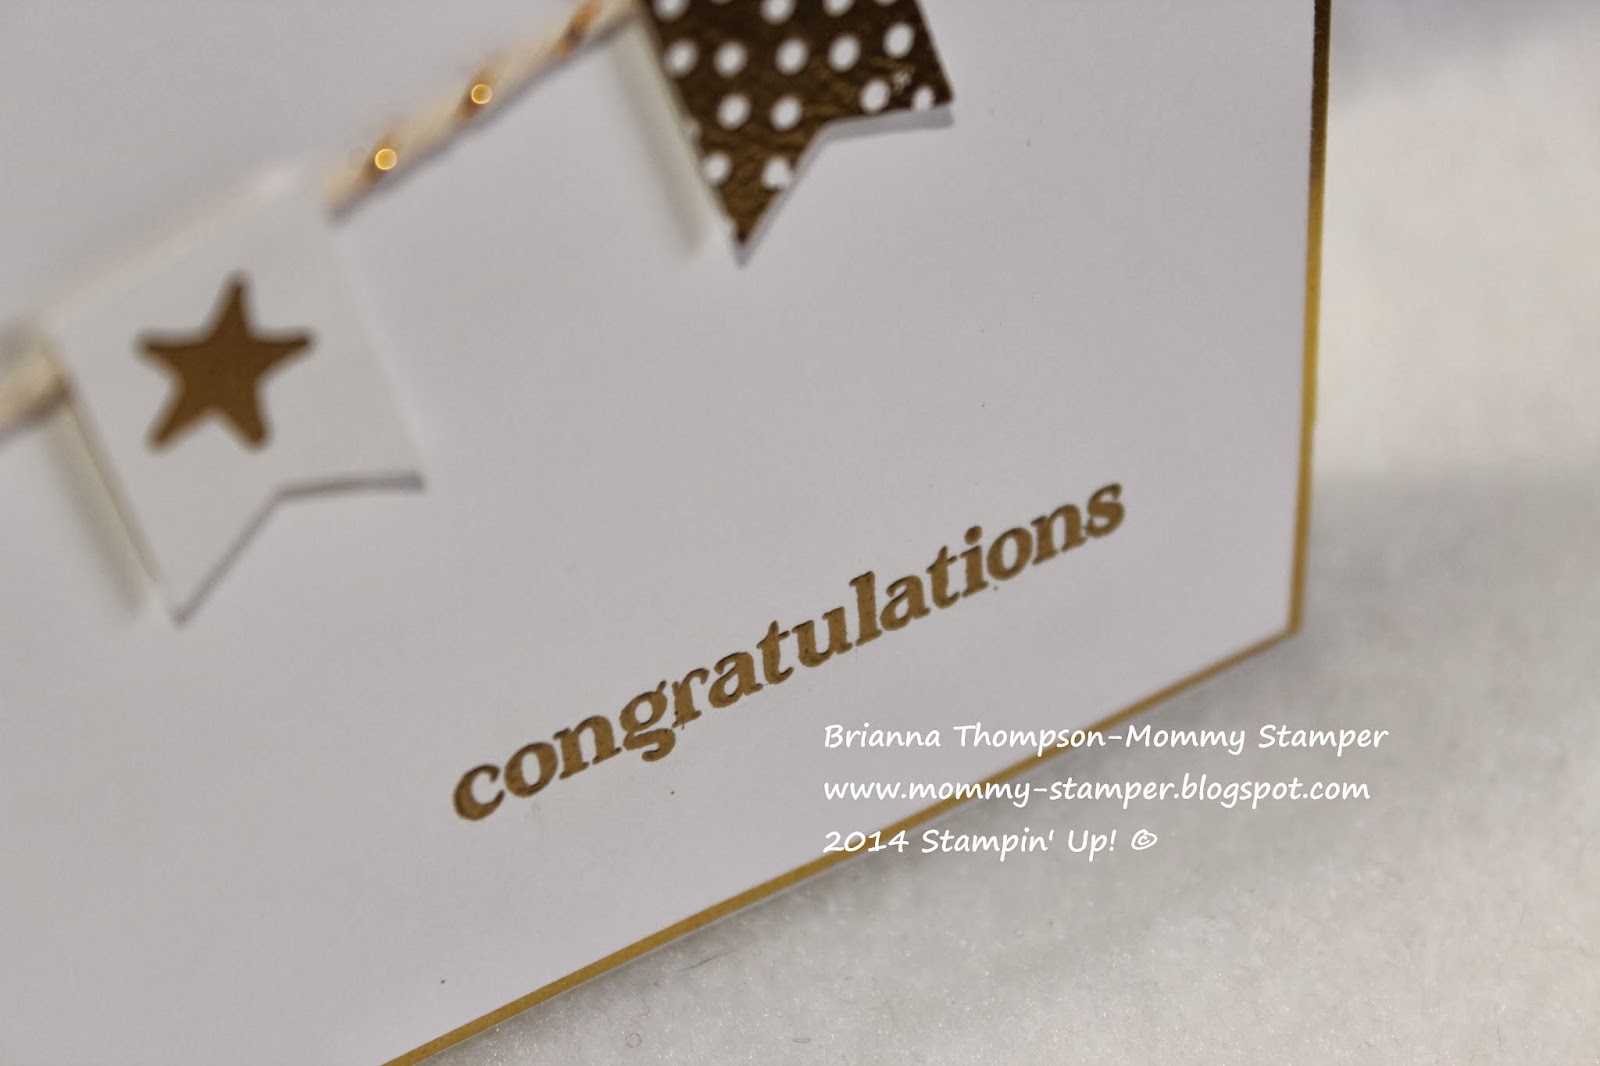
Whenever I say the words "silver and gold" together my mind goes straight to Rudolf...that Christmas movie that was created a zillion years ago that people watch every Christmas! I can hear that song in my head! Well this card is only gold...but it's so stinkin' cute and packs a serious punch!
All of the stamping on this card is heat embossed using Gold embossing powder!
I stamped with VersaMark using the Banner Blast stamp set (a FREE Sale-a-Bration choice!) and embossed it with gold embossing powder. Then punched those cutie patooties out with the Banner Punch (also a FREE Sale-a-Bration choice!) Congratulations is stamped from Delightful Dozen and also embossed. I mounted the congratulations card stock on Gold Foil Paper and then wrapped some Gold Baker's Twine around those two pieces. I popped that piece on my Whisper White card base and just used dimensionals to attach those 4 cute little banners! Easy as that!
If you haven't tried heat embossing before I hope this card makes you want to give it a shot!
I saw this technique on a card on Pinterest and was immediately intrigued! It's actually done with the Chevron Border Punch found in the Occasions Catalog! Paired with the new Hardwood Stamp and Petite Petals it's a garden on a card! We have had an incredibly difficult winter this year here in Gettysburg, PA, so any flowers are appreciated! To make the Lattice look you need two strips of paper that measure 1 1/4" X 8". Punch your Chevron pattern out of both pieces of card stock the entire length. Then with the chevrons pointing in opposite directions, lay one piece of card stock on top of the other and "lock in" the chevrons. You are essentially just popping the points of the chevrons under the opposing piece down the length of the card stock. Then you can slide each piece to get the patter you like. Then use any adhesive to attach it to your card! I used dimensionals for the Island Indigo card and SNAIL adhesive for the Melon Mambo card. Here is the video tutorial:
This example uses Naturals White Card Stock and Island Indigo and Crushed Curry ink
This card uses Whisper White card stock for the lattice and Melon Mambo and Crushed Curry ink.
It's always unfortunate when we need to pull out a sympathy card for someone we care about. Whether it be an illness, loss of a spouse or tragic event, sympathy cards are always something we need to have on hand. Creating a tasteful yet meaningful card can be a challenge. Simplicity is always the key in my mind. I like to focus on one main stamp, in this case it's the orchid from the Happy Watercolor set. Neutral colors are always good as it can be used for our women or men friends. The Hardwood background stamp is absolutely amazing. I have used it on all kinds of projects and absolutely adore it. It's a perfect backdrop to this simple, yet elegant card.
The card stock and ink used is Baked Brown Sugar, but to color in the orchids I used our Chalk Marker. It's a hidden gem in the Occasions Catalog. I absolutely love it! You can use it for so many things, but it adds such a softness to these orchids for this card. I mounted it on a piece of our Naturals White Card Stock to continue the 'earthy' feel. The Gold Baker's Twine adds a simple and elegant feel. The sentiment is heat embossed with Whisper White embossing powder.
This card was so much fun to make, I love the new Hardwood Stamp in the Occasions Catalog, and the little porcupine from the Life in the Forest set goes perfectly with it! This card is a simple way to welcome a baby boy into the world. I used Soft Sky, Baked Brown Sugar and Very Vanilla to create a 'soft' feel to the card. I colored in the porcupine with a Blender Pen and Baked Brown Sugar ink. He is cut out with the Circle Framelits and then I popped it up with a 1 3/4" Soft Sky Scalloped Circle Punch. The sentiment is from A Dozen Thoughts and the ribbon is our beautiful 1/2" Seam Binding Ribbon. I hope you enjoy this cute card as much as I do!
By now you have probably seen these stunning cards done with the new Tag Topper Punches from Stampin' Up! When I first saw them done I thought there had to be a faster and easier way than measuring them on each side with a pencil and erasing and all that. Of course that is an incredibly efficient way of doing it, no doubt about it...but I like to make things easier (in my nature I suppose). Having twins will do that to you : ) Anyway, I decided instead of making a mark on each side by measuring, I just folded the paper over being sure not to crease it and used my paper piercing tool to make a mark. Then I punched out each of the Tag Toppers by lining up that hole, rather than measured lines. You can watch the video to see how I do it below:
I decided to use the Petite Petals Stamp and Punch to accent my card along with some of the beautiful paper from the Fresh Prints Designer Series Paper Stack. I absolutely adore Real Red with Coastal Cabana! I hope you guys enjoy this card as much as I do!
Valentine's Day has gotten so wrapped around expecting expensive gifts....flowers, jewelry, cars...okay, maybe not cards, but you get the idea! Why not take the time to make a special card for a special someone in your life? Sure, it won't cost you a lot of money...but I bet your recipient will appreciate it even more knowing you made it with your own two hands for them!
Supply List:
Coastal Cabana Card Stock #131297
Coastal Cabana Classic Ink #131175
Real Red (Brights Collection) Core'dinations Card Stock #129953
As many of you know I am "Mommy" to three amazing and beautiful children. I thank God every day for them and all the joy they bring to our family. We have two great friends who are also on the journey to parenthood via adoption! We want to help them as much as we can to raise funds for their adoption costs. We are having an Adoption Fundraiser on February 22nd, 2014 at 2:00PM to create these 6 All Occasion Cards. The cost is $20 and $10 of that will go directly to the Adoption Fund! If you would like to support this amazing couple but can't join us on the 22nd I will happily assemble the cards for you and mail them directly to you for no additional cost! Envelopes are included with the cards and of course they are all hand stamped with love! You can also place an order to benefit the adoption fund! All of my commission will also be going straight to the fund, so if you spend $50 you will automatically be giving $10 towards the fund, get the cards for free, your stampin' goodies AND get a FREE Sale-a-Bration item!!!! Just be sure to use Hostess Code HMY3EB7F when you order! Click the photo below to RSVP for this event in person, by mail or to email me your order. You can also place an online order 24/7 at www.relaxinstampin.stampinup.net
Please consider helping this amazing couple make their dreams of parenthood a reality!
There is a hidden gem in the Occasions Catalog on page 22. The small photo that represents these Watercolor Wonder Designer Note Cards and Envelopes does it no justice! You get 4 each of 5 designs. I simply took our Happy Watercolor stamp set, some of our Gold Bakers Twine and Gold Sequin Trim and created these 5 note cards incredibly fast! These note cards are absolutely beautiful, just like the Watercolor Wonder Designer Series Paper. I love the texture and the fact that they come with envelopes. You can't go wrong with these beautiful note cards! They would make it easy to create a quick card for any occasion!
Watercolor Wonder Designer Note Cards and Envelopes #133362
Check out this cute little Valentine Nugget!! This adorable little box is simple to make and is a perfect size for Valentine's Treats! It holds 3 (you could probably squeeze 4) Hershey's Nuggets. You can watch the video below for a step by step tutorial on how to create it:
Here are the measurements and supply list:
You need to start with a piece of cardstock or DSP that measures 5" X 6". With the 6" side at the top of your Simply Scored Tool score it at 1", 2 3/4", 3 3/4" and 5 1/2". Turn it 90 degrees, so now the 5" side is along the top of your score board. Score it at 1" and 4". That's it for scoring. Looking at your card stock, with the 6" at the top you will see your 1/2" strip along the right. You want to trim all of the score lines at the bottom (this will be the bottom of your box) up to the next score line. Then remove the small rectangle on the right hand side that measures 1/2" X 1". Now for the top of your box you again want to trim up all those score lines. This time you will remove that small rectangle again, but also the two squares that are formed as well. This should leave you with two rectangle pieces at the top of your box.
Looking at your card stock again, with the 1/2" strip along the right side you are looking at the basics for your box. On the left hand side you will see the 1" strip, the rectangle next to that will technically be the front of the box. If you want to run a framelit through or punch as I did in the box above, now is the time to do that before you put your box together. Once you have done that it's time to assemble it. Put a piece of sticky strip along the small 1/2" rectangle on the right hand side. Fold it over to attach to the other flap. Then put sticky strip on the front flap of the bottom of the box and fold those over closing the bottom up. Now with a pointer finger on either side of your box, pinch and close the top of your box like a bag. Now you can insert your two tabs into the Scalloped Tag Topper Punch. Be sure it is pushed in all the way and lined up evenly on both sides. Punch. You can then take a piece of ribbon and make a loop to hold the top of the box together after you fill it with your Nuggets! Super simple and takes very little cardstock!
Supply List:
Card Stock/DSP of your choice
Simply Scored Tool #122334
Paper Snips #103579
Bone Folder #102300
Sticky Strip #104294
Heart Framelits #125599
Silver 1/8" Ribbon #132137
Banner Blast (SAB item) WM#133551 CM#133554
Banner Punch (SAB Item) #133519
You can earn the Banner Blast and Banner Punch FREE With a $50 purchase until March 31st!
February 10th is the last day to sign up for Paper Pumpkin and be included in the FREE MARKERS Promotion! So you will get your FREE MARKERS and a FREE Size D CLEAR BLOCK along with your Paper Pumpkin Welcome Kit! Also, as an added bonus if I get one more Paper Pumpkin Subscriber by tomorrow I will enter all of the new subscribers in a drawing for a $50 GRAB BAG of Stampin' Up! Products! I only need one more subscriber to meet my goal! If you help me with this goal, you will not only get entered in the drawing for the grab bag but you will also get the "Mommy Stamper" Customer Service experience!! I pride myself on customer service and spoiling my customers, so join my Paper Pumpkin Posse today! Just click the link above to go to the sign up page!
Some stamps just scream "Watercolor me!!!" and in my opinion Vivid Vases is one of those stamps! Creating this beautiful technique is simple with just a few tools. I stamped my image on a piece of Whisper White Card Stock with Jet Black StazOn Ink. It's very important that you use a high quality cardstock and a permanent ink. If you were to try and 'watercolor' after stamping an image with Classic Basic Black ink it would run and smudge and be sooooo not pretty! So be sure to use StazOn. Once you are sure your image is completely dry, it only takes a moment, you can start coloring in the image. I always use a Blender Pen to watercolor, I prefer the control it gives me, however you can of course create the same effect with the Aqua Painter. Watch the video below to see how I used the Blender Pen and some of our Classic ink to create this simple, yet beautiful card!
Be sure to subscribe to my YouTube Channel so you know when I upload a new video!
Sometimes you just want to switch up a traditional card and go for a fun fold, but an easy fold! This one could not be easier! All you have to do is cut a regular card base, 11" X 4 1/4. I then scored it at 5 1/2" and again at 2 3/4". Then use your bone folder to crease those score lines in a Z pattern and decorate as you wish! I decided to bring out one of the Best of Series Stamps, the Best of Flowers. I used a blender pen and Tangerine Tango and Pistachio Pudding to color in the flower. The DSP is from our new Watercolor Wonder, which I absolutely adore! The "Happy Birthday" sentiment is from Bring on the Cake. A little accent with one of our In Color Boutique Details and this card is sure to make anyone you send it to 'ohhh and ahhh'!
Have you ever thought about joining Stampin' Up? I want to share with you all of the reasons why joining my team during Sale-a-Bration is the best time!
From Stampin' Up!
You can get $150 worth of products of YOUR CHOICE for only $99 plus tax. Even shipping is included!
20% discount on all of your orders
Access to Demonstrator only benefits including a bi-monthly magazine, Demonstrator only items, pre-order products before customers can order them, Stampin' Connection - an online community for Demonstrators, the list goes on and on!
Amazing Demonstrator Support, ever have a question or problem give them a call and they will get it sorted out for you!
From Me
100% support whether you want to just take advantage of the kit deal or be a Full Business Demo. No pressure, just support.
I'm available for questions most of the time, you will have a direct line to me personally.
Attend our Paper Peeps Quarterly Meetings in person, or away. If you are a long distance Demo I will keep you in the loop of everything we do. You will get information from the meeting as well as the projects! I won't leave anyone out, no matter how many miles separate us!
I will be sending a special surprise to you when you join my team during Sale-a-Bration!
Watch the video for more information, and as always, feel free to email me at relaxinstampin@gmail.com or call me at 717-398-2129 with any questions you may have! I would love the opportunity to talk to you about this fantastic opportunity!
If you've never tried the chalkboard technique, it's a lot of fun! Start with a piece of basic black card stock cut down to the size you want. Take your Embossing Buddy...yep you heard me right, your Embossing Buddy, and pat your card stock with it and gently rub it across the paper. It will leave a light dusting of powder that looks very similar to that of a chalkboard that has been erased. Choose the stamp, in this case I used Vivid Vases and ink it up with White Craft Ink. Stamp your image and let it dry. Craft ink does take longer to dry than traditional Class Ink, so be sure to let your image dry thoroughly. You can certainly take your Heat Tool to it to encourage it to dry faster. Once it's completely dry you can finish your project. It really is an awesome technique for stamp sets that look 'drawn' like this one and word stamps.
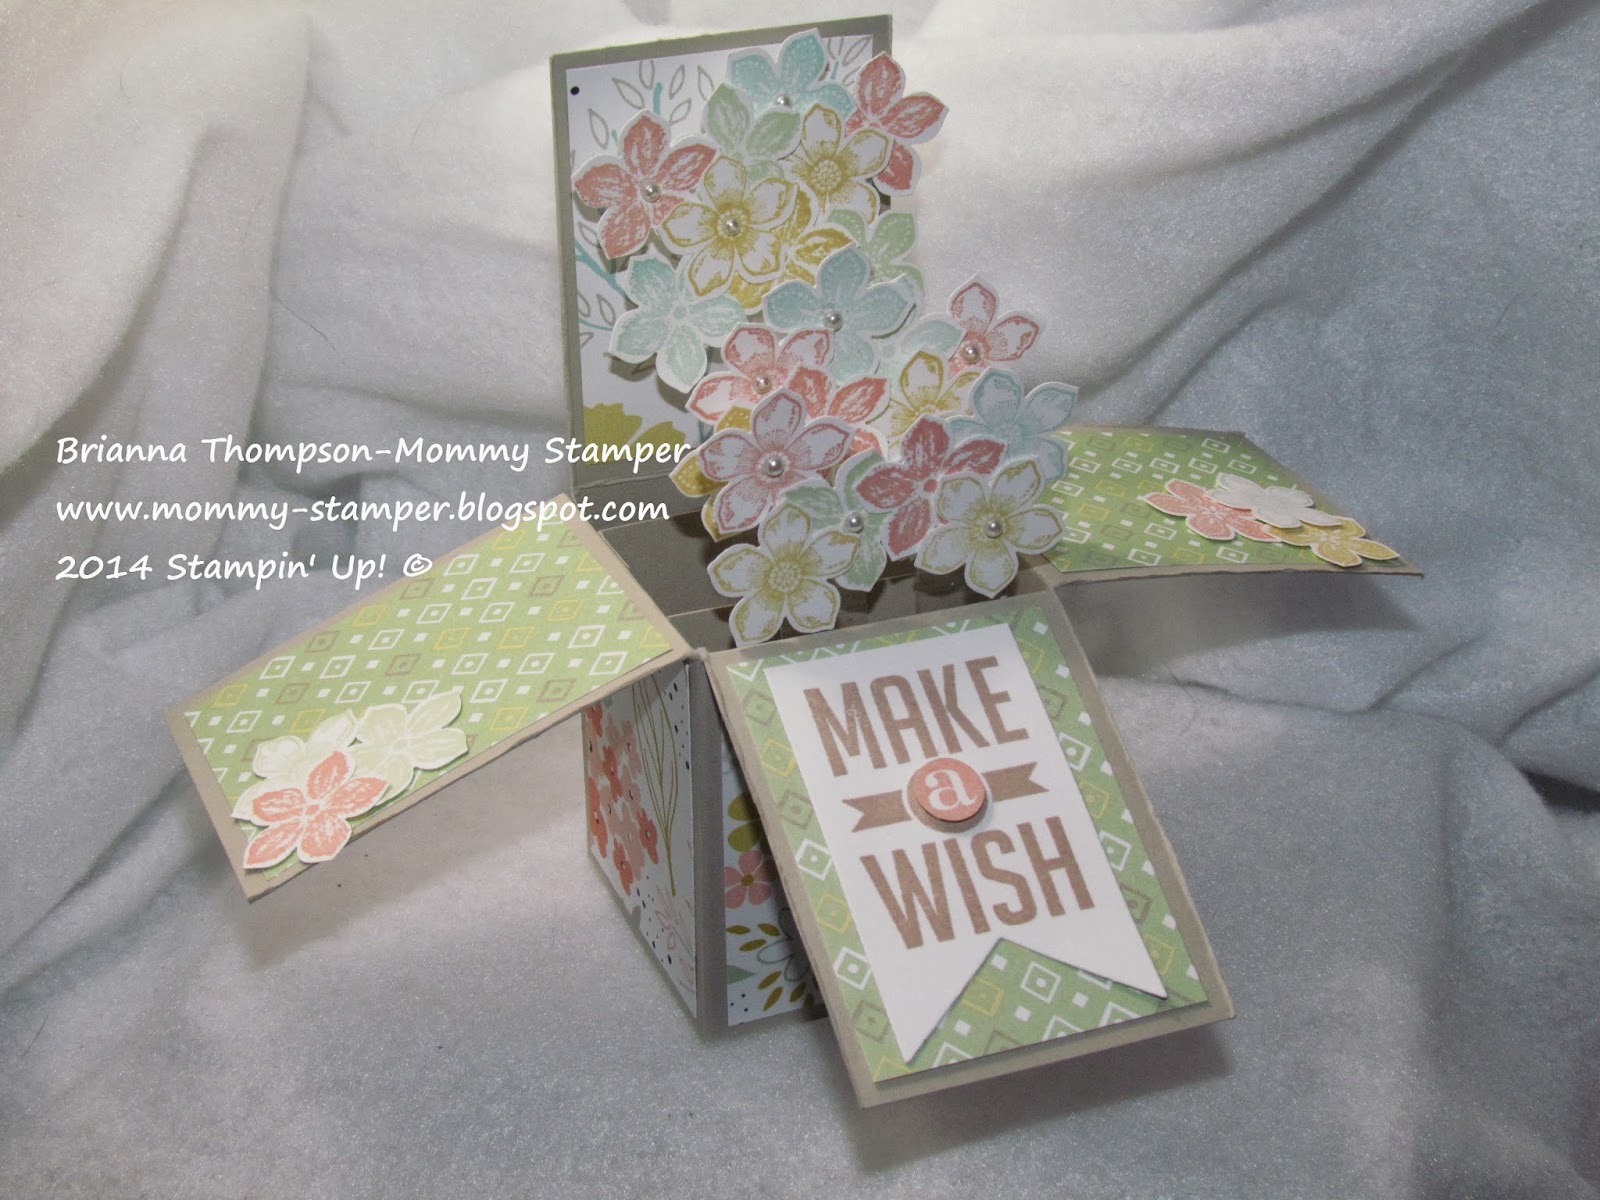
Do you have a special someone you want to send an extra special card too? This "Card in a Box" is sure to impress anyone who receives it! You can see a few of the creations I have done with this technique below. You can also see the video tutorial below. In this particular card I decided to make a 'modern feel' Welcome Baby card. I love bright colored anything, so using Brights collection colors with Zoo Babies and Gorgeous Grunge seemed natural for this card. Although this card can be time consuming, it's totally worth the reaction from the recipient! And the best part, it fits in a standard envelope, no extra postage required!!!
So here are the dimension for this project:
A piece of Card Stock cut at 9" X 5 1/2"
A coordinating piece of Card Stock measuring 3 1/8" X 3 1/8"
4 to 7 Pieces of Designer Series Paper or stamped card stock measuring 1 7/8" X 2 1/2"
A piece of DSP or card stock measuring 1 7/8" X 5 1/4"
These are scoring measurements:
With your 9" X 5 1/2" piece of cardstock with the long side at the top of your Simply Scored, score at 2 1/8", 4 1/4", 6 3/8" and 8 1/2"
turn it 90 degrees so the short side is along the top and score at 2 3/4"
With your 3 1/8" X 3 1/8" piece of card stock you want to score it at 1/2" and 2 5/8", then cut it in half so you have two score lines on each piece.
With your larger piece of cardstock you want to cut up on all of the score lines on one side. Completely remove the small rectangle to one side, and notch out a triangle on the opposing small rectangle to help your box fold together nicely. Burnish all of your score lines with your Bone Folder AFTER you cut and trim your cardstock. It will look better when you are finished. Once you have all of your score lines burnished, place a piece of Sticky Strip along the small remaining rectangle on the outside of the box. Then fold it over and meet it with the other side to form the box.
With the two small pieces of cardstock from earlier, you want to burnish the score lines creating a "Z" shape with the cardstock. Place Sticky Strip on opposing sides of the cardstock. Take one flap and gently put it inside the box with the edge of the cardstock against the back of the box. Gently flatten the box and the two sides with adhere inside the box perfectly for you. Do the same with the other piece of cardstock, but towards the front of the box. Line up the edge of your cardstock with the front and fold it over. Now you will have your box completely formed and ready to go.
Now it's time to decorate and embellish your project. Take the longer strip of DSP or stamped cardstock and put it at the back of your box. I always look for the seam and make that the back of my box. This will hold the back upright. Then take your remaining small pieces of DSP or cardstock and put them on the flaps of your box. You can also put them along the bottom as well as you can see in my other two samples.
This box is done with the 2014 SAB Designer Series Paper, Perfect Pennants and Petite Petals
This one was done with Papillion Potpourri, Happy Watercolor, Simply Sketched and our gorgeous Watercolor Wonder DSP