Friday, August 29, 2014

Vellum Tag Dahlia

I've been a good girl and refrained from using the Regarding Dahlias set for more than a week or so...so it's time again!   I love this set for lots of reasons, but my number one is the fact that you get this stunning dahlia image with some super cute sentiments. It's an 'all-in-one' kinda set!  
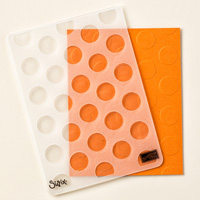
When recreating this card be sure to stamp your dahlia before you emboss the card stock with the Large Polka Dot Embossing Folder.  You may notice that the polka dots actually are de-bossed rather than embossed on this card.  It's on purpose...no, really : )  Normally when you emboss and image with our Embossing Folders you want the Stampin' Up! logo to be on top, that's how you will get the image to look 'raised.'  However, there is no rule saying you can't flip it, so flip it once in a while!  

To get that super cool vellum tag you just punch both ends and thread your ribbon though as shown.  I did put a bit of adhesive down under where the 'hello, you' is to keep it from sliding around.  
Might add this card to next month's Just Cards Class too, what do you think?

Supply List:


Wednesday, August 27, 2014

Masked Butterfly


One of my favorite color combinations are Baked Brown Sugar and Crisp Cantaloupe.  Together they create muted beauty.  Combine them with our Naturals White Card Stock and you have perfection!
Listen to me, I sound like a foodie explaining the latest and greatest dish!  
Another fave of mine is the Hardwood background stamp.  I've used that stamp probably more than any other stamp I own!  From birthday cards to sympathy cards it's the bomb diggity!
This look is actually referred to as a "masking technique".  You mask part of the paper in which you do not want to be 'inked' and stamp or sponge the exposed paper.  To do this particular card I took a large post it note and punched a 2 1/2" Circle in it.  I then laid it over top of my Natural White Card Stock and stamped my Hardwood Stamp.  When you remove that post it note, the image will appear beneath.  You can do this technique with any stamp you want.  I've done it to do sponging, spritzing, you name it.


The Butterfly is from Papillion Potpourri with a sweet little long tailed bow made from our Thick Baked Brown Sugar Bakers Twine.  I'm sure some of you are wondering where the sentiment is from.  I will give you a hint...it's not from the Annual Catalog, it's not a Photopolymer set and it's not even in the Holiday Catalog.  It's an incentive stamp set that you can EARN FOR FREE!!!  Yes, FREE!  Watch for details to come!  In the meantime, I hope you enjoy this sweet little card.  It will be part of my Just Cards Class for September!

Supply List:


Monday, August 25, 2014

Masculine Monday #9

 We are coming to a close of August, so it only seemed right to create this Masculine Monday project using the Big Shot.  The Big Shot Promotion ends on August 31st, so if you haven't already taken advantage of it CLICK HERE to see what it's all about!  Keep in my for those who purchase a Big Shot from me during this promotion you can attend my Technique Class in September for FREE. We will be focusing on a project that utilizes the Big Shot.  I will also send the goodies to create the project to long distance customers automatically.  So take advantage of this promotion and get a FREE Big Shot Class!
I've used the Banner Framelits and the Lucky Stars Embossing Folder (will be in the Holiday Catalog) using the Big Shot!  It truly is my favorite tool because you can do so many different things with it.
You may be wondering about the rounded top of that banner framelit piece.  I have rounded those corners using the Project Life Corner Rounder to give it a different look. 
My favorite part of this card are those sweet little stars on the card base.  They are done using the stars Decorative Mask and a sponge dauber.  Totally loving those decorative masks...expect to see lots of projects featuring them to come!

Supply List: